Download Sewing Software Demo here !
 .
.
Sewing instructions for PatternMaker patterns
General
When you buy your fabric, ask how much it will shrink
when washed. In all cases, when the fabric is washable and when you
are not sure that the fabric won't shrink, it is safe to wash and iron
it before cutting. Don't forget to preshrink lining as well.
Cut pattern pieces on folded fabric, right side of the
fabric folded inwards. Make the necessary marks on the fabric
with chalk or pencil. If the fabric is plaid, striped or checkered,
align the hem lines at the same point on the repeating pattern. For
sleeves, the repeating pattern should match where the bottom of the
armscye and bottom of sleeve cap meet. Vertical centerline of sleeve
should be placed at a vertical stripe or at center of a plaid square.
Jacket, blouse and dress front center should be placed the same way.
Transfer notch marks from your pattern to the fabric
by cutting snips (depth 1/4 inch 5 mm) into seam allowances. When
joining garment pieces, place corresponding notch marks in the two pieces
together.
Cut and iron interfacings onto under collars, facings,
waist bands, slit facings, blouse and shirt button extensions and sleeve
cuffs. If you use interfacing at jacket's hem seam allowance,
you get a neat hem.
If you sew a patch pocket and don't line it, fasten interfacing
to it also. Woven interfacing gives the best results. The
macros draw all facings on top of the garment pieces, with dashed lines.
If you want to print them apart from the pieces, use the Move command
to move them before printing.
Cut lining along with garment patterns without space
for facings (but remember to add seam allowances) and hem seam allowances.
Do not cut lining for collars. Lining fabric usually is not as
elastic as garment fabric, so cut it with about 1/8 inch (0.3
cm) wider seam allowances than for the garment pieces.
Use the longest possible machine stitches for basting.
It is quick and the stitches can easily be removed.
The macros make the patterns without seam allowances.
If you want to add seam allowances, use PatternMaker's Draw Offset and
Draw Seam Allowances commands. The suggested seam widths are 3/8
inch (1 cm) for most seams, and 1 - 1/2 inch (4 cm) for hems and sleeve
ends without cuffs. When you are sewing your first garment with
PatternMaker patterns, add extra seam allowance so that you can make
corrections to the garment if it should be necessary.
You will get the best result if you always press seams
and darts as you sew. First iron seams or darts flat without turning
them to either direction. Then press them towards center, side
seam towards front. Two-piece sleeve seams are both pressed towards
shoulder mark. Use a steam iron. If you press seams from
right side of the fabric, use pressing cloth if necessary.
Edgestitching gives a well-finished look to garment, but only if it
is straight and even. Long stitches of 1/4 inch (4-5 mm) look
best in edgestitching. Sew edgestitching only after you have ironed
the seam.
HOW TO FASTEN ZIPPER
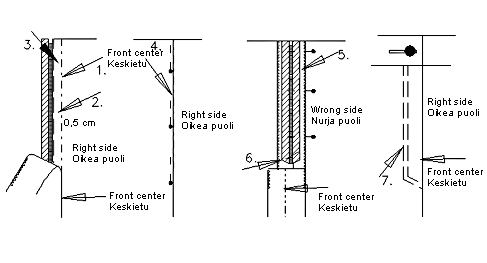
Sew seam to the point where zipper begins and continue
zipper's full length with basting. Press the seam open. Remove
basting stitches. Mark front (or back) centerline with basting
(1). Fold one seam allowance of zipper placket at about 1/4 inch
(0.5 cm) distance from front (or back) centerline (2). Sew one
zipper edge under the extended seam allowance (3). Close zipper
placket temporarily with pins on right side of garment (4). On
wrong side pin other zipper edge flat on seam allowance (5). Make
certain that the zipper is straight and lies flat at an even distance
from edges of seam allowance.
Remove pins from right side. Sew from wrong side
through all thicknesses, across bottom (6) and up the pinned edge of
zipper near zipper teeth. If you want to, you can sew a second
row of stitches one presser foot's distance from the first one (7).
If you are making jeans or other pants that need to be very strong,
strengthen bottom of zipper placket with tight zigzag (bartack) on right
side.
If you want to create an UNNOTICEABLE ZIPPER PLACKET,
sew zipper directly onto garment seam, placing zipper upside down on
a basted seam on wrong side of garment. The distance between the
seam and the zipper stitching is the width of the presser foot.
Basting is removed after sewing. This kind of a zipper is good
for a dress back seam and is also widely used in skirts.
HOW TO FASTEN WAIST BAND TO SLACKS OR SKIRT
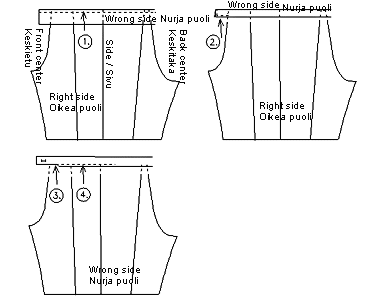
Overlock edges of waistband. Fold waistband lengthwise,
right side out, and press. Sew one horizontal edge of waistband
to garment, right sides together (1). Space for button and buttonhole
extends beyond center front mark at each end of the band. Garment's
waist should always be slightly larger than waistband. Easestitch
garment waist to fit waistband.
Fold waistband lengthwise, right side inside, and sew
across one end (buttonhole end) (2). Cut corners and turn
waistband right side out. Press seam allowance upward (it will
be inside waistband when finished). Fold seam allowance of waistband
in about 5 cm from each end (3). Leave rest of waistband seam allowance
flat. Stitch on right side of garment along first stitch line
(4). Sew buttonhole and fasten button.
HOW TO SEW BACK SLIT FOR SKIRT OR DRESS
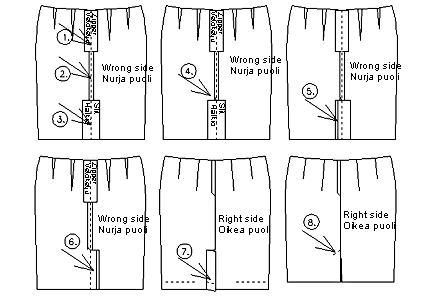
Overlock back center seam. Baste seam for zipper
(1), sew back center seam between zipper and slit (2), and baste folding
line for slit (3). Press seam open. Cut seam allowance diagonally
at upper end of slit (4).
Fold vertical seam allowance of one half of slit inside,
and edgestitch (5). Press flat (6). Fold other half of slit (along
right side of back centerline) inwards and sew across bottom at hemline
(7). Turn slit out to its correct position. Strengthen top
of slit with horizontal or diagonal stitch line thorough all thicknesses
on right side (8).
HOW TO SEW AND ATTACH A COLLAR
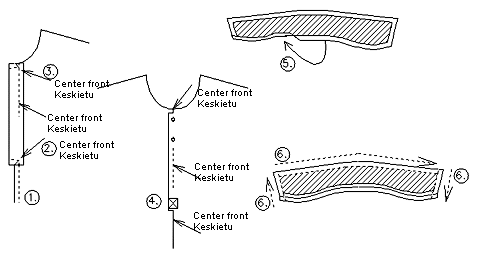
For the collar, cut 2 pieces of fabric and 1 piece of
interfacing. The under collar piece is on the inside, hidden
by the upper piece, when the garment is completed.
Overlock button placket and front center edges.
Sew front center seam from hem to where button placket begins (1).
Fold button placket inwards along fold line and sew along bottom (2)
and top (3) ends from fold line to front center. Cut seam allowances
diagonally at point where seam ends, so that button placket can be turned
right side out.
Turn button placket right side out (4). Place button
plackets' front center marks on top of each other and sew a box at bottom
end of placket. Stitch through all layers of fabric.
Iron interfacing to under collar. Turn bottom seam
allowance of under collar inside and baste (5). Place collar pieces
with right sides together and sew along edges (6). Trim seam
allowances and cut corners. Turn right side out. Sew raw edge
of upper collar to shell's neck from front center to front center, right
sides together. Press seam allowance upwards and pin basted edge
of under collar on top of previous seam. Sew. If you have difficulties
in sewing a neat collar, sew basted edge of under collar by hand.
HOW TO SEW AND ATTACH A HOOD
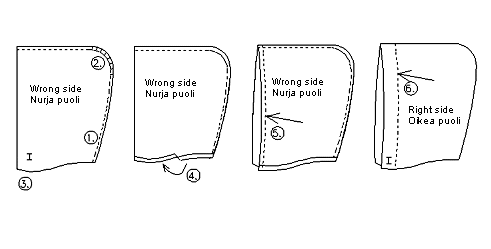
The hood piece in the pattern makes one half of the hood.
Cut 4 pieces, 2 of garment fabric and 2 of lining fabric. The
lining pieces can also be of same or similar fabric, if desired.
Sew both outer pieces together, , right sides together (1). Do
the same with the lining pieces. Snip the seam allowance along
the curved section at back of hood at intervals of about 3/4 inch
or 2 cm (2).
The openings for the drawstring are sewn like small buttonholes
at right side of hood 3/4 inch (2 cm) from front edge and 1 1/2
inches (4 cm) from bottom edge (3). To strengthen button holes,
iron interfacing to wrong side of fabric before sewing button holes.
Turn neck seam allowance of hood lining inwards and baste (4).
Place lining and hood right sides together and sew along front edges
(5). Turn hood right side out.
Sew hood to neck of shell,right sides together, from
center front to center front. Press seam upwards and pin the basted
edge of hood lining onto seam. Sew near edge.
Sew a 3/4 inch (2 cm) wide tube for strings at front
edge (6).
HOW TO SEW AND ATTACH SLEEVE CUFFS
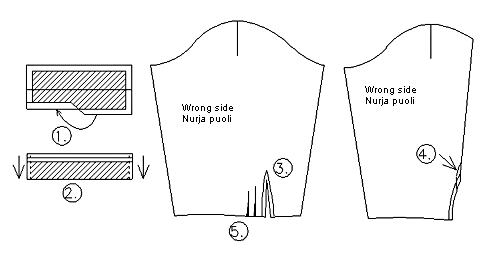
Fold in seam allowance of one long edge of sleeve cuff
and baste (1). Fold cuffs horizontally in two, right sides inside,
and sew along ends (2). Note that seam allowance of one edge has
been folded in, but the other is unfolded, so the edges don't meet.
Cut seam allowance diagonally at corners and turn
cuffs right side out.
Cut slits at ends of sleeves and overlock edges.
Turn seam allowances inside and edgestitch on right side (3).
Fold slit with right side inside and sew across bottom of slit (4).
Fold ease of sleeve ends into soft pleats near split
(5). Sew raw edges of cuffs to sleeve ends with right side
of cuff against wrong side of sleeve. Turn seam allowance inside cuffs
and press. Pin basted edge of cuff onto previous seam and edgestitch
from right side.
Sew buttonholes and attach buttons to cuffs.
HOW TO SEW SIDE POCKETS
Cut 4 pieces for pockets, 2 for pocket back pieces and
2 for pocket linings.
Place pocket lining piece on the shell, right sides together.
Sew along pocket mouth (1). Cut seam allowance diagonally (2).
Turn pocket lining to inside and topstitch pocket mouth (3). Place
pocket back piece under pocket lining piece edges matching (4).
Sew and overlock along round and bottom edges. Pocket back piece
is attached to side seam when sides are sewn. Be careful not to
sew pocket mouth.
You get detailed sewing instructions for different garments
by moving to the following pages.


 .
. .
.
